

Toby10
-
Posts
63 -
Joined
-
Last visited
-
Days Won
9
Content Type
Forums
Store
Downloads
Events
Gallery
Everything posted by Toby10
-
Version 1.0.0
34 downloads
The Archive Contains the Following: NoCrematorExplosion.ba2" NoExplosions.ba2" NoSmokeM.ba2" NoSmokeT.ba2" info.txt" NoArms.ba2" -
View File NO DOORS COLLECTION 1.0 The Archive Contains the Following: NoDoors.ba2" NoSiloElevatorHatch.ba2" NSD.ba2" security-door.ba2" DrM.ba2" EZWestek.ba2" info.txt" Submitter Toby10 Submitted 02/27/2026 Category Fallout 76
-
Version 1.0.0
35 downloads
The Archive Contains the Following: NoDoors.ba2" NoSiloElevatorHatch.ba2" NSD.ba2" security-door.ba2" DrM.ba2" EZWestek.ba2" info.txt" -
View File GLOWING ITEMS 1.0 The Archive Contains the Following: Glow.ba2" GlowingKeys.ba2" info.txt" BagGlow.ba2" Submitter Toby10 Submitted 02/27/2026 Category Fallout 76
-
Version 1.0.0
24 downloads
The Archive Contains the Following: Glow.ba2" GlowingKeys.ba2" info.txt" BagGlow.ba2" -
View File GLEAMING DEPTHS RAID COLLECTION 1.0 The Archive Contains the Following: bigfuel.ba2" bigfuel[small can].ba2" Drill_Skip.ba2" Guardian.ba2" info.txt" raid_big_fuelcans.ba2" raid_big_generators.ba2" yes i know there are duplicate NAMES - but the mod is different. Submitter Toby10 Submitted 02/27/2026 Category Fallout 76
-
Version 1.0.0
96 downloads
The Archive Contains the Following: bigfuel.ba2" bigfuel[small can].ba2" Drill_Skip.ba2" Guardian.ba2" info.txt" raid_big_fuelcans.ba2" raid_big_generators.ba2" yes i know there are duplicate NAMES - but the mod is different. -
Fallout76 Start Pack 4.0 View File The Archive Contains the Following: OPLegendaries.ba2" Zoom.ba2" FasterMelee.ba2" HalfOffLegendaries.ba2" info.txt" OPGuns.ba2" Submitter Toby10 Submitted 02/27/2026 Category Fallout 76
-
Version 1.0.0
76 downloads
The Archive Contains the Following: OPLegendaries.ba2" Zoom.ba2" FasterMelee.ba2" HalfOffLegendaries.ba2" info.txt" OPGuns.ba2" -
Fallout76 Start Pack 3.0 View File The Archive Contains the Following: InstantPowerArmor.ba2" MagicBullet.ba2" PiggyBank.ba2" PurchaseProfit.ba2" reject_any_quest.ba2" RepairAnything.ba2" RevengeWhileWanted.ba2" DevContainers.ba2" info.txt" InstaBed.ba2" InstaCore.ba2" Submitter Toby10 Submitted 02/27/2026 Category Fallout 76
-
Version 3.0.0
77 downloads
The Archive Contains the Following: InstantPowerArmor.ba2" MagicBullet.ba2" PiggyBank.ba2" PurchaseProfit.ba2" reject_any_quest.ba2" RepairAnything.ba2" RevengeWhileWanted.ba2" DevContainers.ba2" info.txt" InstaBed.ba2" InstaCore.ba2" -
Fallout76 Start Pack 2.0 View File The Archive Contains the Following: NoClip.ba2" ScorchedOfficer-nukemute.ba2" TheTreesareGnomes(TreesOnly).ba2" BushBeGone.ba2" CompatibleWeightIndicator.ba2" FastTerminals.ba2" ImprovedHealthBars.ba2" info.txt" MoreLoot.ba2" MuteNukeZone.ba2" Noalarm.ba2" Submitter Toby10 Submitted 02/27/2026 Category Fallout 76
-
Version 2.0.0
63 downloads
The Archive Contains the Following: NoClip.ba2" ScorchedOfficer-nukemute.ba2" TheTreesareGnomes(TreesOnly).ba2" BushBeGone.ba2" CompatibleWeightIndicator.ba2" FastTerminals.ba2" ImprovedHealthBars.ba2" info.txt" MoreLoot.ba2" MuteNukeZone.ba2" Noalarm.ba2" -
Fallout76 Start Pack 1.0 View File These are just simple start packs - 95% VATS.ba2" FasterFirerate_2.0.ba2" firerateandswing.ba2" fireratelegendary.ba2" InstantReloads.ba2" No Item Processing.ba2" NoSpinup.ba2" NoStagger.ba2" SkipScrapLegendaryPremium.ba2"\ UnlimitedGatlingMag.ba2" Submitter Toby10 Submitted 02/27/2026 Category Fallout 76
-
Version 1.0.0
82 downloads
These are just simple start packs - 95% VATS.ba2" FasterFirerate_2.0.ba2" firerateandswing.ba2" fireratelegendary.ba2" InstantReloads.ba2" No Item Processing.ba2" NoSpinup.ba2" NoStagger.ba2" SkipScrapLegendaryPremium.ba2"\ UnlimitedGatlingMag.ba2" -
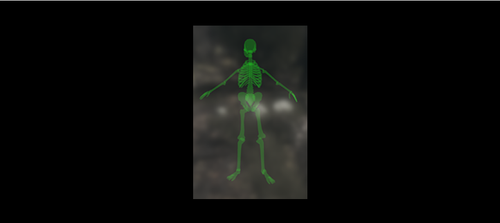
View File PlayerSkeletonESP - Green.ba2 This mod, projects a faint/translucent image of the skeleton over every players body. this is also known as Extrasensory perception (ESP). Human players will have this Friendly allies will also have this. Installation Instructions: Once you download the file, use anyone of the file extractors, Winzip, PowerArchiver or even WinRar Extract the file, in this case, the mod file is called, PlayerSkeletonESP - Green.ba2 Locate the Data Folder: Find your Fallout 76 installation folder, specifically the Data folder (e.g., Steam\steamapps\common\Fallout76\Data). Move the BA2 File: Drag and drop the downloaded PlayerSkeletonESP - Green.ba2 mod file into this Data folder. Edit Fallout76Custom.ini: Navigate to Documents\My Games\Fallout 76. If Fallout76Custom.ini does not exist, create a new text file and name it Fallout76Custom.ini. Open the file and add the following lines (or append to existing lines): ini [Archive] sResourceArchive2List = ModName.ba2, PlayerSkeletonESP - Green.ba2 Note: Separate multiple mods with a comma. (modname.ba2,modname2.ba2,modname3.ba2m,) Launch the Game: Start Fallout 76; the mods should now be active. Take note, some mods, like HUDplayerList or TextChat, need to be last on this list to run correctly. Submitter Toby10 Submitted 02/23/2026 Category Fallout 76
-
Version 1.0.0
10 downloads
This mod, projects a faint/translucent image of the skeleton over every players body. this is also known as Extrasensory perception (ESP). Human players will have this Friendly allies will also have this. Installation Instructions: Once you download the file, use anyone of the file extractors, Winzip, PowerArchiver or even WinRar Extract the file, in this case, the mod file is called, PlayerSkeletonESP - Green.ba2 Locate the Data Folder: Find your Fallout 76 installation folder, specifically the Data folder (e.g., Steam\steamapps\common\Fallout76\Data). Move the BA2 File: Drag and drop the downloaded PlayerSkeletonESP - Green.ba2 mod file into this Data folder. Edit Fallout76Custom.ini: Navigate to Documents\My Games\Fallout 76. If Fallout76Custom.ini does not exist, create a new text file and name it Fallout76Custom.ini. Open the file and add the following lines (or append to existing lines): ini [Archive] sResourceArchive2List = ModName.ba2, PlayerSkeletonESP - Green.ba2 Note: Separate multiple mods with a comma. (modname.ba2,modname2.ba2,modname3.ba2m,) Launch the Game: Start Fallout 76; the mods should now be active. Take note, some mods, like HUDplayerList or TextChat, need to be last on this list to run correctly. -
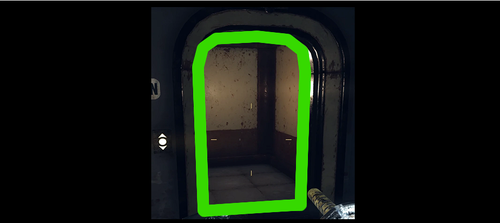
View File No More West-Tek Doors THIS WILL REMOVE ALL WEST TEK DOORS! WARNING ! - SOME MISSIONS REQUIRE YOU TO HAVE A DOOR TO WORK WITH - just close the game, remove the mod, restart game do what you need to do, get to a saving point, then close, re-add mod and restart - YOU WILL HAVE TO DO THIS WITH A MAJORITY OF ANY MOD THAT REMOVES DOORS - MISSIONS REQUIRE SOME DOORS ACCESSIBILITY. Installation Instructions: Once you download the file, use anyone of the file extractors, Winzip, PowerArchiver or even WinRar Extract the file, in this case, the mod file is called, DrM.ba2 Locate the Data Folder: Find your Fallout 76 installation folder, specifically the Data folder (e.g., Steam\steamapps\common\Fallout76\Data). Move the BA2 File: Drag and drop the downloaded DrM.ba2 mod file into this Data folder. Edit Fallout76Custom.ini: Navigate to Documents\My Games\Fallout 76. If Fallout76Custom.ini does not exist, create a new text file and name it Fallout76Custom.ini. Open the file and add the following lines (or append to existing lines): ini [Archive] sResourceArchive2List = ModName.ba2, DrM.ba2 Note: Separate multiple mods with a comma. (modname.ba2,modname2.ba2,modname3.ba2m,) Launch the Game: Start Fallout 76; the mods should now be active. Take note, some mods, like HUDplayerList or TextChat, need to be last on this list to run correctly. Submitter Toby10 Submitted 02/23/2026 Category Fallout 76
-
Version 1.0.0
9 downloads
THIS WILL REMOVE ALL WEST TEK DOORS! WARNING ! - SOME MISSIONS REQUIRE YOU TO HAVE A DOOR TO WORK WITH - just close the game, remove the mod, restart game do what you need to do, get to a saving point, then close, re-add mod and restart - YOU WILL HAVE TO DO THIS WITH A MAJORITY OF ANY MOD THAT REMOVES DOORS - MISSIONS REQUIRE SOME DOORS ACCESSIBILITY. Installation Instructions: Once you download the file, use anyone of the file extractors, Winzip, PowerArchiver or even WinRar Extract the file, in this case, the mod file is called, DrM.ba2 Locate the Data Folder: Find your Fallout 76 installation folder, specifically the Data folder (e.g., Steam\steamapps\common\Fallout76\Data). Move the BA2 File: Drag and drop the downloaded DrM.ba2 mod file into this Data folder. Edit Fallout76Custom.ini: Navigate to Documents\My Games\Fallout 76. If Fallout76Custom.ini does not exist, create a new text file and name it Fallout76Custom.ini. Open the file and add the following lines (or append to existing lines): ini [Archive] sResourceArchive2List = ModName.ba2, DrM.ba2 Note: Separate multiple mods with a comma. (modname.ba2,modname2.ba2,modname3.ba2m,) Launch the Game: Start Fallout 76; the mods should now be active. Take note, some mods, like HUDplayerList or TextChat, need to be last on this list to run correctly. -
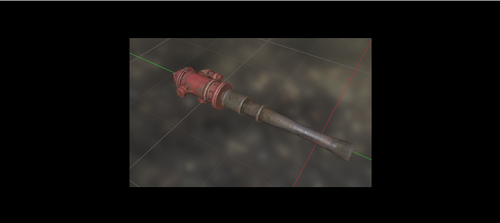
View File Firehydrant Bat This mod replaces the standard Baseball Bat, with the firehydrant instead. Now you have the bigger stick... note: this is client side only.. meaning, only you can see this, or anyone else, having this exact file installed on Their end. Installation Instructions: Once you download the file, use anyone of the file extractors, Winzip, PowerArchiver or even WinRar Extract the file, in this case, the mod file is called, FireHydrantBat.ba2 Locate the Data Folder: Find your Fallout 76 installation folder, specifically the Data folder (e.g., Steam\steamapps\common\Fallout76\Data). Move the BA2 File: Drag and drop the downloaded FireHydrantBat.ba2 mod file into this Data folder. Edit Fallout76Custom.ini: Navigate to Documents\My Games\Fallout 76. If Fallout76Custom.ini does not exist, create a new text file and name it Fallout76Custom.ini. Open the file and add the following lines (or append to existing lines): ini [Archive] sResourceArchive2List = ModName.ba2, FireHydrantBat.ba2 Note: Separate multiple mods with a comma. (modname.ba2,modname2.ba2,modname3.ba2m,) Launch the Game: Start Fallout 76; the mods should now be active. Take note, some mods, like HUDplayerList or TextChat, need to be last on this list to run correctly. Submitter Toby10 Submitted 02/23/2026 Category Fallout 76
-
Version 1.0.0
5 downloads
This mod replaces the standard Baseball Bat, with the firehydrant instead. Now you have the bigger stick... note: this is client side only.. meaning, only you can see this, or anyone else, having this exact file installed on Their end. Installation Instructions: Once you download the file, use anyone of the file extractors, Winzip, PowerArchiver or even WinRar Extract the file, in this case, the mod file is called, FireHydrantBat.ba2 Locate the Data Folder: Find your Fallout 76 installation folder, specifically the Data folder (e.g., Steam\steamapps\common\Fallout76\Data). Move the BA2 File: Drag and drop the downloaded FireHydrantBat.ba2 mod file into this Data folder. Edit Fallout76Custom.ini: Navigate to Documents\My Games\Fallout 76. If Fallout76Custom.ini does not exist, create a new text file and name it Fallout76Custom.ini. Open the file and add the following lines (or append to existing lines): ini [Archive] sResourceArchive2List = ModName.ba2, FireHydrantBat.ba2 Note: Separate multiple mods with a comma. (modname.ba2,modname2.ba2,modname3.ba2m,) Launch the Game: Start Fallout 76; the mods should now be active. Take note, some mods, like HUDplayerList or TextChat, need to be last on this list to run correctly. -
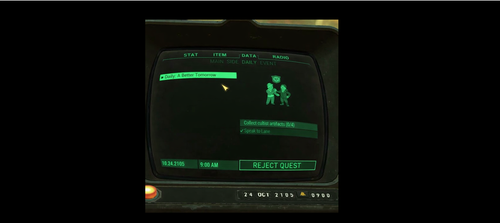
View File REJECT ANY QUEST This adds the button, "Reject Quest" This is good, if you broken the quest, or its not loading right..etc id still ONLY use it as a LAST resort - WARNING: USE AS LAST RESORT - OR YOU COULD BREAK YOUR PROGESS (Then youd have to have bethesda reset that mission for you) Installation Instructions: Once you download the file, use anyone of the file extractors, Winzip, PowerArchiver or even WinRar Extract the file, in this case, the mod file is called, reject_any_quest.ba2 Locate the Data Folder: Find your Fallout 76 installation folder, specifically the Data folder (e.g., Steam\steamapps\common\Fallout76\Data). Move the BA2 File: Drag and drop the downloaded bigfuel.ba2 mod file into this Data folder. Edit Fallout76Custom.ini: Navigate to Documents\My Games\Fallout 76. If Fallout76Custom.ini does not exist, create a new text file and name it Fallout76Custom.ini. Open the file and add the following lines (or append to existing lines): ini [Archive] sResourceArchive2List = ModName.ba2, reject_any_quest.ba2 Note: Separate multiple mods with a comma. (modname.ba2,modname2.ba2,modname3.ba2m,) Launch the Game: Start Fallout 76; the mods should now be active. Take note, some mods, like HUDplayerList or TextChat, need to be last on this list to run correctly. Submitter Toby10 Submitted 02/23/2026 Category Fallout 76
-
Version 1.0.0
15 downloads
This adds the button, "Reject Quest" This is good, if you broken the quest, or its not loading right..etc id still ONLY use it as a LAST resort - WARNING: USE AS LAST RESORT - OR YOU COULD BREAK YOUR PROGESS (Then youd have to have bethesda reset that mission for you) Installation Instructions: Once you download the file, use anyone of the file extractors, Winzip, PowerArchiver or even WinRar Extract the file, in this case, the mod file is called, reject_any_quest.ba2 Locate the Data Folder: Find your Fallout 76 installation folder, specifically the Data folder (e.g., Steam\steamapps\common\Fallout76\Data). Move the BA2 File: Drag and drop the downloaded bigfuel.ba2 mod file into this Data folder. Edit Fallout76Custom.ini: Navigate to Documents\My Games\Fallout 76. If Fallout76Custom.ini does not exist, create a new text file and name it Fallout76Custom.ini. Open the file and add the following lines (or append to existing lines): ini [Archive] sResourceArchive2List = ModName.ba2, reject_any_quest.ba2 Note: Separate multiple mods with a comma. (modname.ba2,modname2.ba2,modname3.ba2m,) Launch the Game: Start Fallout 76; the mods should now be active. Take note, some mods, like HUDplayerList or TextChat, need to be last on this list to run correctly. -
View File SP SPOOF About This File This just removes the textures collision. so use this if you wish, or our Built-in No Clip Author Notes; This mod removes wall and door collisions; look at the pictures to see which objects it is Installation Instructions: Once you download the file, use anyone of the file extractors, Winzip, PowerArchiver or even WinRar Extract the file, in this case, the mod file is called, SP-SPOOF.ba2 Locate the Data Folder: Find your Fallout 76 installation folder, specifically the Data folder (e.g., Steam\steamapps\common\Fallout76\Data). Move the BA2 File: Drag and drop the downloaded SP-SPOOF.ba2 mod file into this Data folder. Edit Fallout76Custom.ini: Navigate to Documents\My Games\Fallout 76. If Fallout76Custom.ini does not exist, create a new text file and name it Fallout76Custom.ini. Open the file and add the following lines (or append to existing lines): ini [Archive] sResourceArchive2List = ModName.ba2, SP-SPOOF.ba2 Note: Separate multiple mods with a comma. (modname.ba2,modname2.ba2,modname3.ba2m,) Launch the Game: Start Fallout 76; the mods should now be active. Take note, some mods, like HUDplayerList or TextChat, need to be last on this list to run correctly. Submitter Toby10 Submitted 02/23/2026 Category Fallout 76